You don’t have to wait months to see your backyard renovation come to life.
In fact, you just need to install a selection of artificial green walls that are so lifelike that even you can forget they’re not real.
Recently, we witnessed the power of a creative idea, a relentless drive to execute, and a few hardworking friends to lend a hand.
One of our clients undertook a complicated DIY backyard project using faux green walls, and we’d like to share the process and give you a few tips on how to do something similar ahead of the summer season.
Looking to get inspired? Keep reading.
How a Client Renovated Their Backyard with Faux Green Walls
Recently, our team worked with a client who wanted to level up their backyard with a visually striking feature wall. They had ideas for using LED wall art on top of a green wall, but they needed some guidance on the type of fauxliege to use and the installation process.

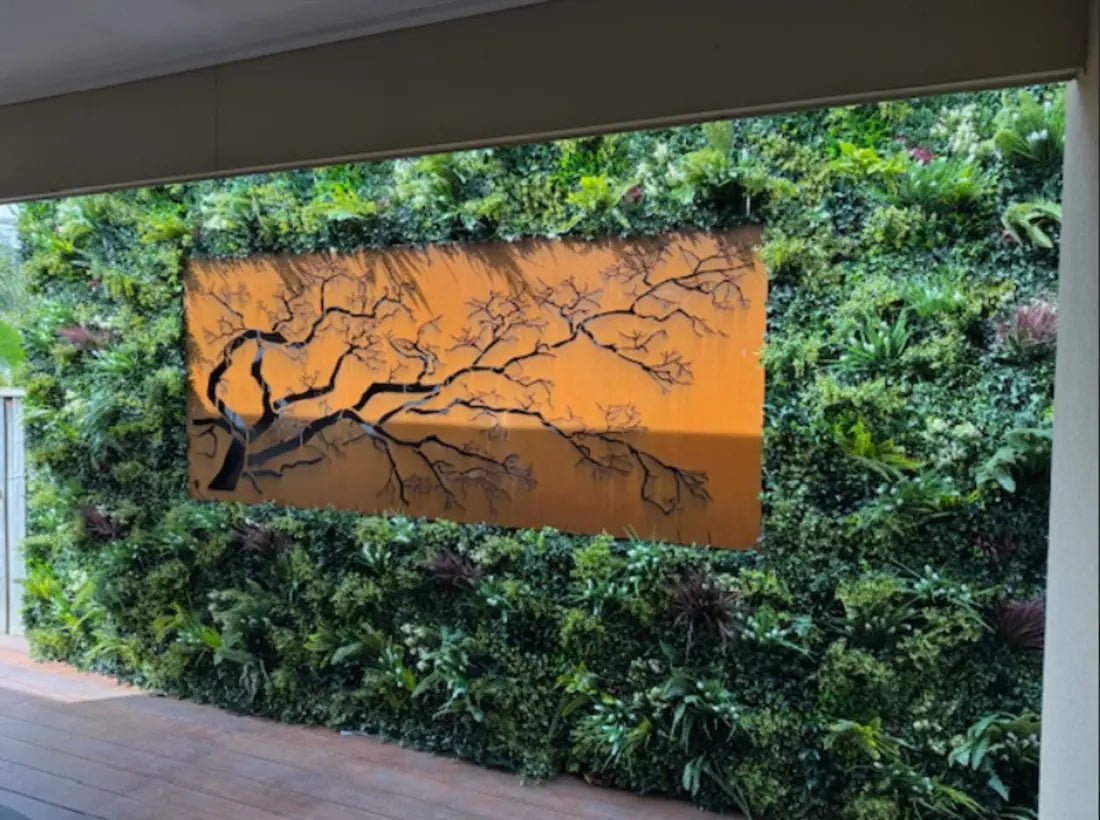
The goal was to create a lush, natural-looking backdrop to serve as a focal point during the day and turn into an illuminated statement piece at night.
To achieve this, they got our Ultra Luxury Lush Spring faux green wall and combined it with custom LED light wall art.

The clients wanted to DIY their space, and our team was happy to fall back into a supporting role.
The client started by preparing the wall. Since the existing wall wasn’t suitable for direct panel installation, the client had to cover it with a waterproof cement sheet. This provided a stable, moisture-resistant foundation that prevents any potential damage from outdoor exposure.

Once installed, the client painted the cement sheet black to create depth and enhance the contrast between the greenery and the LED light wall art.
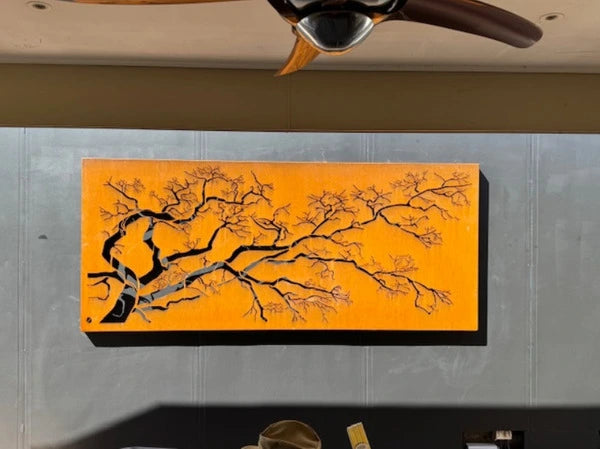
The next step was securing the custom large wall art with LED lights. This piece was designed as a laser-cut tree silhouette that lights up in the dark. Before installing, the client had to double-check that the decor could withstand outdoor conditions.

Once the artwork was in place, the client began installing the artificial green wall panels. The panel they chose has:
-
UV resistance to ensure vibrancy
-
Mixed foliage for a realistic appearance
-
Durable and long-lasting materials
By day, the artificial plant wall with lights contributes to a fresh, natural ambience and complements the outdoor space. At night, the backlit tree artwork comes to life and casts a glow that highlights the intricate details of the design.
This project demonstrated how a green wall with LED lights was an idea no one expected but everyone needed. The client achieved a high-impact, low-maintenance backyard upgrade that will remain beautiful for years to come.
DIY Tips for Adding Artificial Vertical Gardens to a Backyard
If you also want to redecorate your backyard with an artificial vertical garden without outside help, you’ll need to heed some advice.
Before you do anything, you need to follow proper planning and installation techniques to ensure you get a professional finish.
Here’s what our decades of experience have taught us about DIYing an artificial plant wall with lights:
Wall prepping
The most important step when starting your project is to prepare a sturdy, weather-resistant surface for your artificial vertical garden. If your existing wall is rough, uneven, or made of porous materials like brick, you’ll need to smooth it out to provide a suitable foundation for your panels.
Taking our client’s idea, a great way to do this is by installing cement sheets, which provide the solid base needed for attaching the greenery.
For added contrast, we recommend painting the surface black before attaching the faux plant wall panels. A dark background makes the foliage appear fuller, hides any small gaps, and brings in more depth.
Remember to also check if the base material is properly sealed to prevent moisture damage.
If you’re working with a non-solid structure, attach a timber or metal frame first to create a reliable structure for securing your panels.
Position planning
Before you start installing, take time to plan the positioning of your faux vertical garden. Set your decor up for success by ensuring it’s protected from fire hazards, wiring, and severe weather conditions.
While our faux green walls come with 5-year warranties, they don’t cover damage done by extreme weather, so take precautions.
If you’re incorporating wall art or lighting like our client, map out these placements in advance to ensure your design is balanced. Mark out the dimensions using painter’s tape or chalk to visualize the layout before making changes.
After this, you can start covering the wall with your panels. We suggest starting from the edges and working inwards to ensure even coverage. For a more detailed walkthrough, check out our installation guide.
Adding lights

To make sure your artificial green wall is visible at night, add lighting. The best way to highlight textures and depth is by using LED strip lights, spotlights, or backlit panels with designs (like our client did).
When installing your lights, conceal the wiring to keep it clean and polished. You can run cables behind the panels, use battery-operated LED lights, or connect them to an outdoor power source with waterproof casings.
We also suggest using a timer or smart lighting system to automate the lights so you don’t have to remember to turn them on every evening.
You can also control the ambiance of your space with the light color you choose. Namely, use warm white LED lights to evoke coziness or cool-toned lights for a high-contrast effect.
Decorating with wall art

Lastly, don’t skimp out on wall art - it’s one thing that can take your artificial green wall from simple to spectacular. A metal cut-out design or laser-cut panel, like our client used, will do wonders for texture and contrast, which in turn makes the greenery feel even more dynamic.
Choose materials like weather-resistant aluminum, steel, or acrylic to ensure longevity in outdoor conditions. Or, you can even cut and shape the panels themselves to serve as wall art.
When placing your art, make sure it’s securely mounted to withstand wind and outdoor elements. If you’re using a lighted metal panel, align it with your lighting plan so that the backlighting highlights the design at night. Make sure you don’t completely cover any other accessories.
Remember to keep the size of your artwork proportional to the green wall. A large statement piece works well as a focal point, but you can also group smaller pieces together for an artistic touch.
Finishing Thoughts
Those are some of our top DIY tips for decorating a backyard with an artificial vertical garden that requires minimal upkeep.
If you want to do things by the book, don’t skip any of the steps, as they’re all crucial for achieving a professional result.
And if you need bespoke advice, contact our expert team and ask them anything you’d like to know - they’ll be happy to give you ideas.