We have heaps of guides detailing the process of installing artificial green walls on colorbond fences. We’ve also conveyed that this process is as easy as installing vertical gardens on other surfaces. And while that’s true, many clients deal with restrictions that don’t allow such modifications.
No matter how gentle the installation is, the simple fact that we use screws and drills for metal fences ultimately means that some penetration of the fence will occur. For some, this may not be a big deal, but for others, it could create a rift and a visit from HOA.
Some homeowners may be able to screw into the colorbond capping and ensure the screws aren’t visible from the other side. Still, some may not even be allowed to do that.
After dealing with this issue on two occasions, at a retirement village and a private home estate, we created this guide to walk you through a solution that keeps all sides happy.
Let’s get into it.
How Do We Install Faux Green Walls on Fences?
Installing faux green walls and artificial hedge panels starts with you. Before you order your panels, you need to measure the surface you want to cover and calculate how many hedge panels you’ll need for full coverage.
We made this easier for you by including a panel calculator on each product page. It looks like this:

Additionally, you’ll also need to tell us whether you plan on going the DIY route or need professional installers.
When it comes to installing faux green walls on colorbond fences, installers will likely use screws and washers directly onto the fence. If that’s an issue and you cannot have screws going into the other side, we recommend attaching timber pailings (strips) from top to bottom. That way, you can screw into the fence base railing and top capping. Then, you staple the panels directly onto the timber.
With this, we ensure that the screws don’t poke through.
How to Install a Faux Green Wall Without Damaging the Fence
Recently, we ran into an issue with 2 clients who wanted a green wall but had strict requirements regarding modifications to shared structures. One lived in a retirement village, while the other had a private home estate.
They both faced one common rule that prohibits attaching anything to colorbond fences using hooks, screws, or any methods that might penetrate the fence.
For many people, this means they can’t hang anything on their fences - no hanging baskets, no decorations, no greenery. So, these people wouldn’t be able to ‘legally’ install vertical gardens for any reason because they would cause damage and violate estate rules.
The client at the retirement village wanted to install an artificial green wall along the side of their house. Unfortunately, all these restrictions posed a challenge because traditional installation methods still involve drilling or attaching support structures that may cause damage and be visible from the neighbor’s side.
So, we had to get creative and come up with a solution for both clients to make sure their fence and decor stayed intact.
After carefully deliberating and checking in with the clients, we devised a non-invasive solution that allowed the installation without violating even the most stringent estate regulations.
We used mesh panels and garden stakes to create a freestanding structure that supported the green wall while remaining independent of the fence. This is a solution we haven’t implemented before, but it was the right decision for this situation.
The Step-by-Step Process of Creating a Freestanding Green Wall
Like most novel projects, we had to go through a bit of trial and error before we came to the ideal solution. Here’s what that looked like step by step:
Step 1: We selected the materials - mesh panels that could support the greenery and garden stakes to secure the structure.

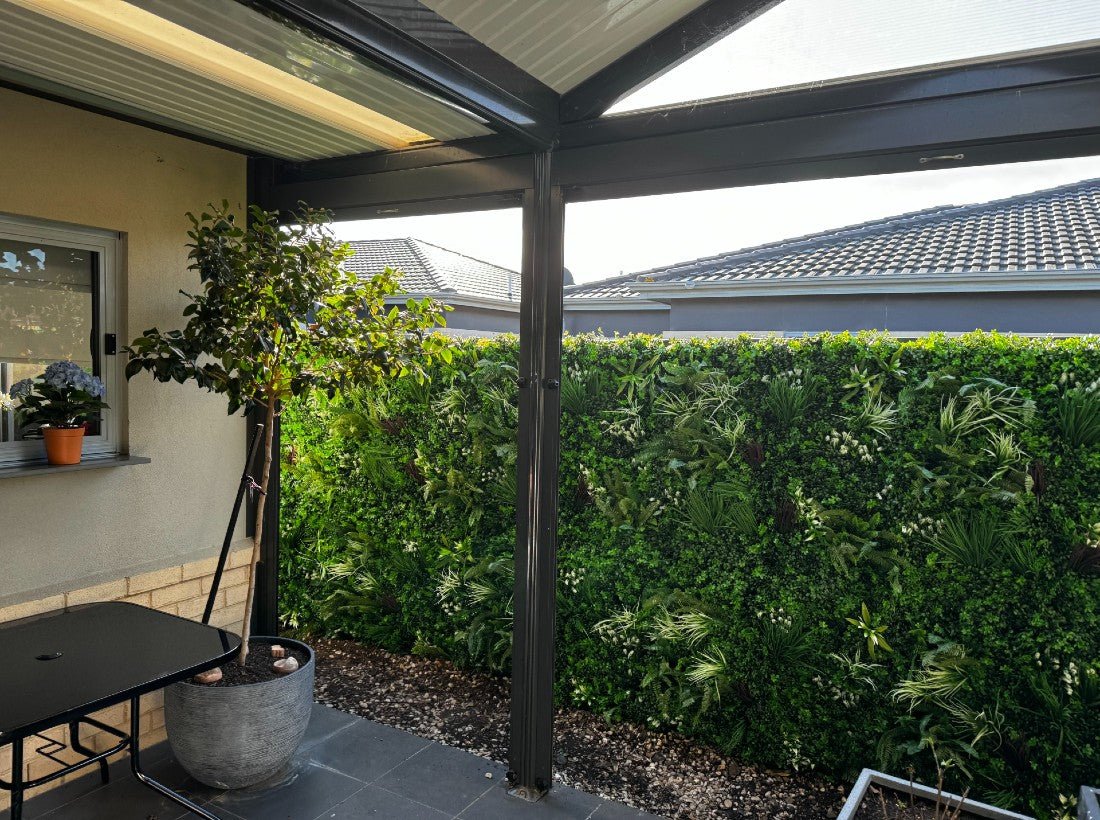
Step 2: We brought in the panels - one client used our Luxury Lavender Fields faux green wall and the other used the Luxury Tropical Vista.

Step 3: For one client, we identified that the garden bed along the side of the house would work as a base for securing the mesh panels.

Step 4: We positioned the panels against the colorbond fence and ensured they were aligned and stable.
Step 5: We hammered the garden stakes into the ground spaced out at about 3 feet to provide support for the mesh panels.

Step 6: We secured the mesh panels to the garden stakes using cable ties or zip ties to ensure every part was stable.

Step 7: We attached the faux green wall panels to the mesh with more zip ties, as if we were attaching it to a cyclone fence.

And we were done!
Additional Tips
To help you get the job done quicker and easier, here are a few other handy options to install your faux green wall on a metal fence:
Tip 1: Use a magnetic hook to hang your panels.
Tip 2: Use S hooks to hang the panels. In our scenario, we couldn’t even let the hooks hang over, but many railings and fences aren’t subject to such strict requirements.
Tip 3: Use chicken wire and run it along the fence line.
Tip 4: Stake the chicken wire and zip-tie your artificial hedge panels.
Finishing Thoughts
Thanks to this innovative approach, we could meet the clients’ needs without damaging their fences or violating rules. The results were beautiful and functional green walls that enhanced their outdoor space without causing unnecessary issues for their neighbors.
We’re thankful our clients were patient enough to let us experiment to find the right solution for them. We’re also happy they didn’t have to give up their vision because of community regulations.
Hopefully, we can put this new knowledge to good use and perfect our installation of freestanding faux green walls for future clients.
If you need a similar installation done on your property, contact us and let’s talk about what our team can do for you!